
 |
| The kitchen at time of home purchase. |
 |
| The house was built in 1984 and has had a previous update. |
The first thing I did to it was to take off the top cabinet doors; there was just too much melamine for me. I also got rid of the light fixtures and installed simple, brighter track lights.
 |
| Kitchen, Phase 1 |
Then, I got rid of the island that was stuck in the middle of it, it was just too bulky for me. Although the storage space was much appreciated, it blocked precious natural light and took too much space.

 |
| Kitchen, Phase 2 |
 |
| A few island cabinets placed against the wall as makeshift buffet, full of art supplies. |
In the future I will install a bigger kitchen window to allow more natural light. The current version of my kitchen has lost all the top cabinets, original light fixtures, popcorn ceiling and tile floor, leaving just the concrete slab throughout the house until I'm ready to tackle flooring.
I am placing half of the island cabinets along the fridge wall, increasing my counter space. The other half have become a rolling island/ art storage cabinet that I desperately needed for my art materials.
🐵
This entry will take you thru my process of creating the rolling art storage unit and share tidbits of information gathered by it.
Here are the things I wanted to accomplish by completing this project:
1. Experiment with chalk paint and use wax to give it an "antique" finish, which I had never done before.
2. Work out any equipment or/and technique hiccups as a preamble to my work on the kitchen cabinets.
3. Create a mobile storage solution for the large majority of my art supplies, including large drawing pads, boards, animation disk, drawing desktop and oversized work.
4. Create a standing height work surface that could also serve as buffet during social gatherings.
I used a few materials I already had at home and purchased some more at the local big orange box store.
Items purchased:
- One 4'×8'×1/4" masonite sheet $8
- One 4'×80'×5/8" plywood sheet $32
- Two 3" fully rotating casters, w/o brakes. $8 e/a I already had 4 of them).
- Can of spray paint $6
- Pack of drawer bumpers $3
- Pack of 6 drawer handles $24
- Quart of flat paint $12
- "Americana" brand creme wax, clear and dark brown $12 e/a
- Box of plaster of Paris $6
- Painter's caulk $2
- Wood filler $6
Now, let's begin to make something out of these:

1. First, I had to fix one of the cabinets. The side panel had come off and it was falling apart from being moved around too many times. I glued, brad nailed, strapped it and let it dry overnight. I used my circular saw to rip the material that made the toe kick all around the unit.
 |
3. I flipped the cabinets on their back to glue and screw a few 2"×4"s.

4. In the meantime, I lightly sanded and painted the casters, so the silver metal would not clash with the finished look of the piece.
Also, a bag of porcelain knobs I had found at a thrift store many moons ago.


5. The next day I flipped the entire unit and installed the bottom panel. It is 5/8" plywood cut 6 inches deeper than the cabinets. I installed the casters wherever there was a 2"×4".
I glued and stapled a piece of 1/4" masonite across the back and glued, screwed and strapped the top to dry overnight.
6. Now I could install the trim, using 1"x2" and 3" boards. Again, I used masonite to cover the back and glue and brads to attach the verticals to the top.
I filled gaps with wood putty and let it dry. I then sanded, caulked and primed the unit.

7. It was time to start with the drawers and doors. I dismantled the fronts, labeled everything carefully and saved all hardware.
I chose not to adhere new material to the oak trim due to its thickness and opted instead for another solution.
I pried the oak trim off the fronts leaving whatever dowels were left behind. Using a spare door from another cabinet, I ripped and chopped pieces of the same measurements for each drawer and door front.

8. Using the original trim I removed as a guide, I clamped the cut pieces neatly, marked the center of each dowel position and drilled new holes. This is the part where a little jig would have made the job easier. Well...a drill press would not hurt either. But, it turned out well enough for me.
I added new dowels and glue where needed and patched the fronts.
I lightly sanded and cleaned all the pieces.
 9. Back to ripping with the circular saw, I cut 2.25" wide strips out of a piece of 2'×4'×1/4" underlayment I had laying around.
I glued, taped, faced them down and let them dry overnight. The next day I used wood filler, sanded and primed all fronts and backs.
 10. Next up: painting! I used 1/3 cup of water, 1/3 cup of plaster of Paris and 1 cup of flat paint to make my chalk paint. I made sure to mix the water and plaster thoroughly before adding the paint. Everything got 3 coats.
I then applied the first layer of clear wax and while it dried, buffed it with a rag to a light sheen.
I repeated the process with the dark wax but this time I let it dry for an hour and proceeded to lift some areas with a damp lint free rag.


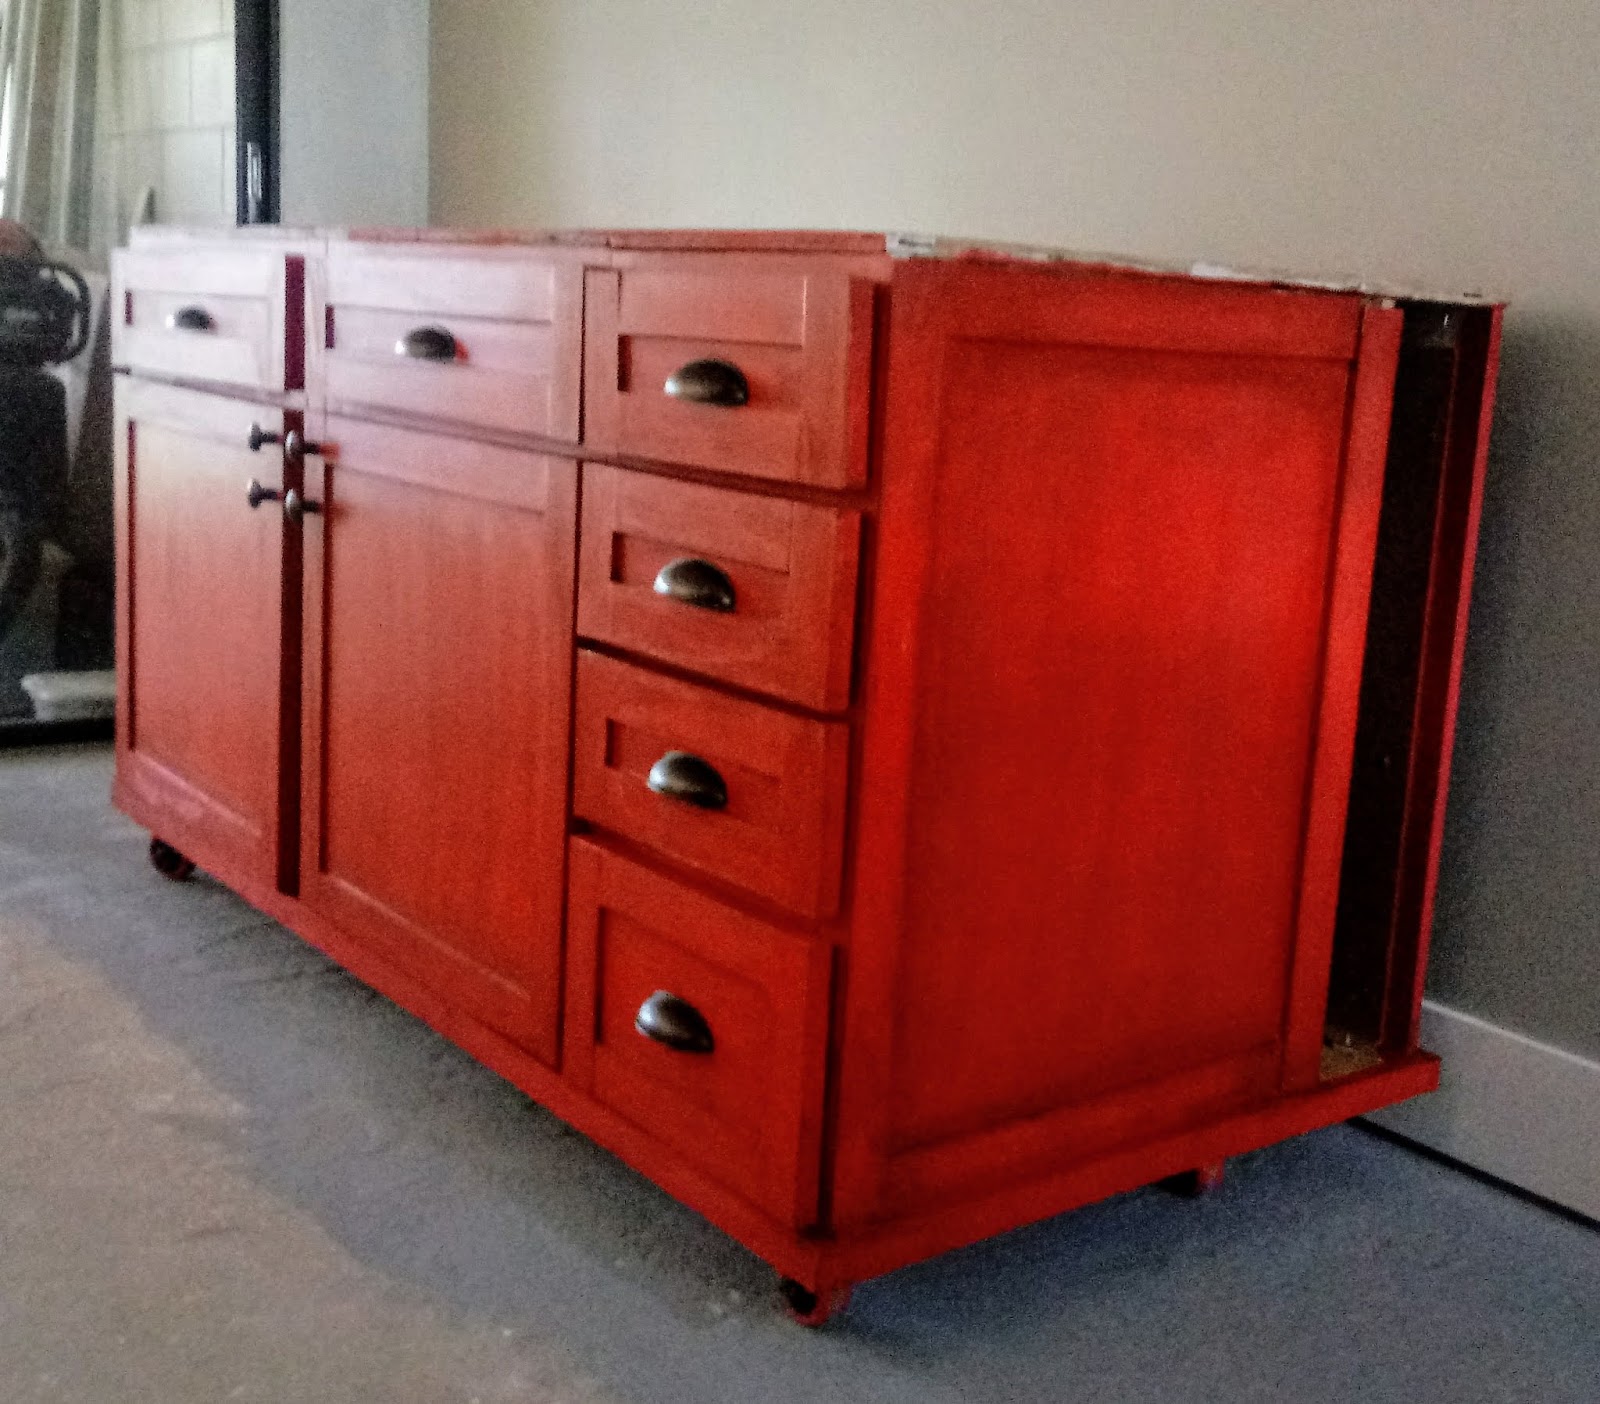
12. That's how I made this unit. It measures 65.75"L x 33"D x 36.5"H including the 3" casters and without a worktop at the moment.


Here are a few things I have learned in this process:
1. Hit Amazon for hardware first.
2. If working without a plan, cut only when you are ready to assemble, not when you "think you know what you want".
3. Table saws are awesome and mine needs to be set up before I tackle the kitchen, which means the garage needs a major clean up!
4. Get a dowel jig kit ($7 at HD, $3 at Harbor Freigth). It will make things easier.
5. If chalk paint and wax is your thing, make your own and get a buffer brush for your power drill. It will spare you some $ and elbow grease.
6. A pneumatic paint canister would really be awesome for this type of thing.
I filled gaps with wood putty and let it dry. I then sanded, caulked and primed the unit.

7. It was time to start with the drawers and doors. I dismantled the fronts, labeled everything carefully and saved all hardware.
I chose not to adhere new material to the oak trim due to its thickness and opted instead for another solution.
I pried the oak trim off the fronts leaving whatever dowels were left behind. Using a spare door from another cabinet, I ripped and chopped pieces of the same measurements for each drawer and door front.

8. Using the original trim I removed as a guide, I clamped the cut pieces neatly, marked the center of each dowel position and drilled new holes. This is the part where a little jig would have made the job easier. Well...a drill press would not hurt either. But, it turned out well enough for me.
I added new dowels and glue where needed and patched the fronts.
I lightly sanded and cleaned all the pieces.

I glued, taped, faced them down and let them dry overnight. The next day I used wood filler, sanded and primed all fronts and backs.

I then applied the first layer of clear wax and while it dried, buffed it with a rag to a light sheen.
I repeated the process with the dark wax but this time I let it dry for an hour and proceeded to lift some areas with a damp lint free rag.


11. I made a template out of scrap material for the hardware installation. Measuring carefully, I made a tiny mark in the center of each front, after it was assembled to each drawer. I lined my mark with the center of my template and drilled where needed.
Lastly, I added drawer bumps, to all the fronts.

12. That's how I made this unit. It measures 65.75"L x 33"D x 36.5"H including the 3" casters and without a worktop at the moment.

 |


Here are a few things I have learned in this process:
1. Hit Amazon for hardware first.
2. If working without a plan, cut only when you are ready to assemble, not when you "think you know what you want".
3. Table saws are awesome and mine needs to be set up before I tackle the kitchen, which means the garage needs a major clean up!
4. Get a dowel jig kit ($7 at HD, $3 at Harbor Freigth). It will make things easier.
5. If chalk paint and wax is your thing, make your own and get a buffer brush for your power drill. It will spare you some $ and elbow grease.
6. A pneumatic paint canister would really be awesome for this type of thing.
🐒
Overall, I am very happy with the outcome. I most definitely have achieved my goals. I now have a solid, heavy duty, costume made piece of furniture for my art supplies and a great conversation piece that can move with me if need be. Best of all, I have managed to keep perfectly sound and working cabinets out of a landfill. Yay!
I hope you found this process interesting and reach out if you have any questions.
I still have a few more cabinets to repurpose, so I hope you visit me again!
I still have a few more cabinets to repurpose, so I hope you visit me again!
You can fddind the video of this conversion here:
No comments:
Post a Comment